Unit control inputs
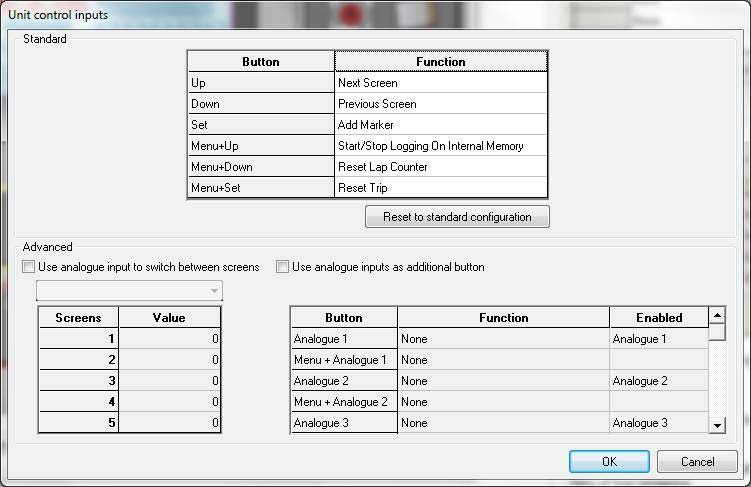
There are four buttons on the standard wiring loom for the DASH2 PRO. Menu, Set, Up, Down. The function of these buttons can be changed to one of many different functions. Open the DASH2 PRO configuration software and select the Unit control input icon.
The standard options for unit control are always available. The advanced control is optional with the advanced control license.
Standard Unit control input settings
For each of the buttons, as well as the combination of Menu + button, one of the following settings can be selected:
Select Trip Computer Info
When selected, and only if the advanced option is enabled, the screen will change to show the three timer values for Power on, Engine on, and engine over a set limit, as well as the number of miles of fuel remaining.
Next Screen
Changes to the next available screen of data. If only one screen is enabled nothing will happen
Previous Screen
Changes to the previous available screen of data. If only one screen is enabled nothing will happen
Show Max/Min
Changes the screen to show the maximum values on the current screen, after 5 seconds the screen will change back to normal.
If pressed again within that 5s period the screen will change to show the minimum values
If pressed for a third time the max / min values will be reset.
Review Session
Sets the DASH2 PRO up in to the session review mode, where each lap and sector of data can be viewed.
Toggle Day Night Mode
Overrides the sidelight input to toggle between the day / night settings
Reset Values
This resets all variables which have been selected in the ‘Variable reset group’ to zero. Very useful for checking changes in temperatures / pressures / ride heights.
Reset Lap Times
Clears all records of best lap and sector times
Reset Lap Counter
Clear the lap counter back to zero
Add Marker
When logging data and with a valid GPS signal, pushing this button will add a lap marker at the current location and in the current direction. If this is the first marker it will become the lap marker, subsequent markers become sector markers.
Reset All Markers
Delete all markers and remove the marker file if there is one for the current location. This won’t do anything unless there is a valid GPS lock. Marker files will only be removed from the internal memory, not when connected to an external data logger for lap timing.
Start/Stop Logging On External Device
If connected to an external logger such as a DL1 MK3 this will start or stop logging on the remote device
Start/Stop Logging On Internal Memory
If the option is enabled on the unit for internal data logging, selecting this option will enable the button to toggle the data logging. The actual data which is logged is configured here.
None
Button performs no function.
Advanced Unit control input settings
The Advanced unit control inputs enable Analogue inputs which are not currently configured for data logging to be used as additional soft buttons, or to switch between screens. Note that any analogue inputs which are currently configured for logging will not appear in this list, if all analogue inputs are configured for logging then no settings can be made here. Analogue inputs are configured here.
An analogue input can be used as a selector to change automatically between the different screens on the DASH2 PRO. To do this set votlage for each screen. The DASH2 PRO will read the voltage and select the screen with the closest voltage.
It is not a good idea to set the tolerance on the inputs too tightly in case there is some variation in the readings on the channels, for example it might read 0.95v instead of the ideal 1v.
The four standard and four optional analogue inputs can also be used as extra button giving a possible 16 extra buttons if required. To use an input as a button it should be connected with a momentary switch to one of the 5v reference outputs or to the 12v supply on the system.