Alarms
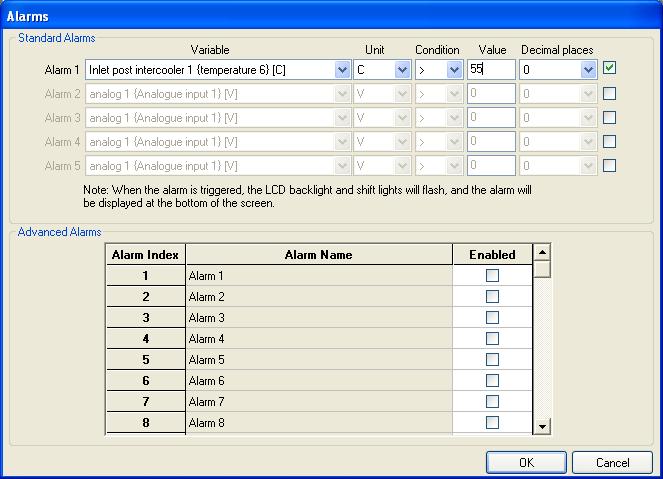
The alarms on the DASH2 PRO can be used to alert the driver to out of range conditions on any parameters which are being monitored. This data could be from internal sensors or external sensors being read over the serial or CAN bus. Alarms are configured directly from the DASH2 PRO configuration software. To set these up start the DASH2 PRO configuration software and click on the Alarms icon:
There are two types of alarms, ‘standard’ which are available all the time, and ‘Advanced Alarms’ which are only available if the ‘Advanced features’ option is enabled.
Standard Alarms
Up to 5 alarms can be configured on the DASH2 PRO, for each of the alarms, select the channel to be used, then select greater than or less than, and finally set the value which is to be used for the alarm. When the alarm is triggered the screen of the DASH2 PRO will change to show the channel which has triggered the alarm and the value.
When an alarm is shown on the screen it can be cleared by pressing any button. After pressing a button the DASH2 PRO will wait for 30 seconds before monitoring that alarm again.
Advanced Alarms
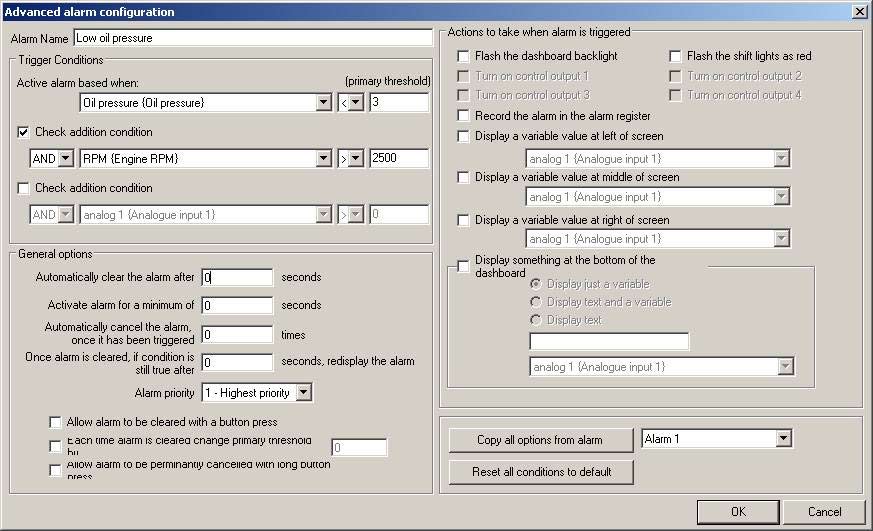
With the advanced alarm settings on the DASH2 PRO it is possible to set up to 99 unique alarm conditions. Each alarm can be enabled or disabled individually. To configure an alarm first enable it by ticking the box and then click on the alarm name to bring up the configuration screen:
The advanced alarms allow much more freedom in terms of the alarm configuration, in the trigger conditions it is possible to set up to three conditions for triggering the alarm. In the above example the alarm is set to come on when the oil pressure is below 3 bar and the engine speed is above 2500. The logic is processed in the format:
Condition1 AND/OR (Condition2 AND/OR Condition3)
The general options for the alarm set up how the alarm is cleared, there are a number of options here:
Automatically clear the alarm after xx seconds
This can be used so that the alarm will show for a set period of time on the display and will then clear automatically without the driver needing to press any buttons to clear the alarm
Activate alarm for a minimum of xx seconds
When this option is set the alarm can not be cleared until this time has elapsed, even if a button is pressed in this time period to clear the alarm
Automatically cancel the alarm once it has been triggered x times
This option can be used to stop an alarm condition re-occuring many times and having to be cleared every time. For example if there is a water temperature alarm the driver might well know all about the condition but not want to be reminded of it on every lap, so it can be set to stop being displayed after a set number of times. USE WITH CAUTION!
Once alarm is cleared, if condition is still true after xx seconds, redisplay the alarm
This option is very useful for giving information on an alarm where the condition persists for a long length of time. For example if the water temperature goes too high and the alarm is activated, using this option it is possible to have the alarm trigger again 30s or a minute later if the condition is still true
Alarm priority
There are 10 different levels for alarm priority, if more than one alarm is activated at the same time the alarm with the numerically lower priority will show up on the screen first. Also if an existing alarm is being displayed and a new alarm with a lower priority is triggered then
Allow alarm to be cleared with a button press
When set the alarm can be cleared by pressing a button, otherwise the user needs to wait for the timeout to occur.
Each time alarm is cleared change primary threshold by xx
This function can be used to increase or decrease a threshold so that the driver is not bothered again unless the situation gets worse. USE WITH CAUTION
Allow alarm to be permanently cancelled with long button press
When pressed and held for over 3 seconds the alarm will be disabled until the unit has been turned off and on again. USE WITH CAUTION
Actions to be taken when alarm is triggered
When the alarm conditions are met and the alarm is activated there are a number of different options for how the user is made aware of the alarm, these are as follows:
Flash the dashboard backlight
Flash the shift lights as red
The backlight or the shift lights can individually be configured to flash to attract the attention of the driver
Turn on control output 1
Turn on control output 2
Turn on control output 3
Turn on control output 4
If the ‘low side driver’ option is enabled on the DASH2 PRO and the input pins 1-4 are not being used for any other function (analogue input, unit control input, output driver) then they can be used by the alarm to trigger an external warning.
Record the alarm in the alarm register
When set the alarm information will be stored in the internal alarm register. This can be very useful for showing which alarms were present during driving, ideal for use in vehicles which are rented out to paying customers!
Display a variable at left of screen
Display a variable at middle of screen
Display a variable at right of screen
When the alarm is activated any value can be shown in any of the three main display areas, this does not have to be the value which triggered the alarm
Display information at the bottom of the screen
A custom text string, a variable value, or both can be displayed across the bottom of the screen when the alarm is activated
Alarm conditions can be copied from one alarm to another by selecting the required source alarm and clicking ‘Copy all options from alarm’ at the bottom of the screen.