How do I use the Lite Monitor?
The Lite Monitor can be used to display live serial data from a number of RT products, including the DL1, AX22 and Speedbox.
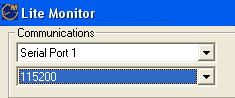
When opening the Lite Monitor, you will see two drop down menus in the top, left hand corner. Use them to select the correct serial port and baud rate.
It is worth noting that the baud rate of all RT products when supplied is 115200. This will only alter if specifically set by the user.
Once the serial port and baud rate have been selected, press the connect button to start the monitor.
Once the monitor is opened, you will see a "Packet Counter" section at the top of the window. The figure next to "OK" represents the "packets" of information that are being successfully read. This figure should continually rise whilst the monitor is in use. The number of "Errors" should remain at a fixed rate once the monitor is open.
Below this, you will find an options section. This will allow you to alter both the precision and filtering of the data displayed.
By altering the precision bar, the levels of accuracy displayed will change. In the example given, increasing the level of precision to the maximum has allowed the monitor to display information to three extra decimal places.
By raising or lowering the filtering bar, the amount of time over which the samples are averaged will be changed. With the filtering set at a low, the samples will be shown very accurately, but in quick succession. Raising the levels filtering will diminish the accuracy of the readings on the one hand, but will also make them more easily intelligible on the other.
The Reset Origin button in the top, right hand corner of the monitor screen can be used to reset the x and y positions to 0. This can be useful if, for example, logging has been started without there being a firm GPS lock.
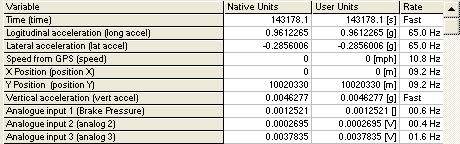
The table that forms the majority of the monitor window displays the information that is being received from the RT product. The far right hand column shows the rate at which the information is being sampled. This may be changed by using the configuration software, although (due to the limitations caused when re-flashing) the number displayed will only ever be an approximation.
The other two columns display the data itself. The Native Units represent the raw information that is being logged. The User Units display that information in units, that have been set by the user. The way in which the units are displayed can be altered using the analysis software. (e.g. the speed can be set to display mph rather than kph; or one of the analogue inputs can be set to act as a specific type of sensor),
The table, depicted above, shows all of the variables that have been recorded. By clicking on the "Graphing Mode" button, you can access a screen that will allow you to look at one variable in detail.
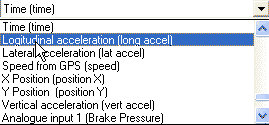
Select the variable that you wish to view from the drop down menu on the "Graphing Mode" screen.
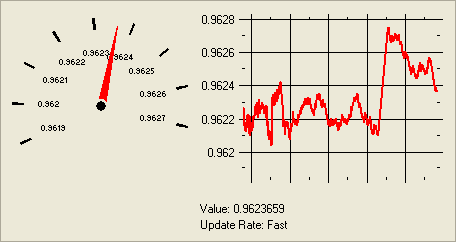
This variable will now be displayed on both the dial and in graph form.
When you wish to exit the monitor, simply press the disconnect button, and then click on the  button, in the top, right hand corner of the screen..